


Alright boys and girls, settle down. It’s time to put your tin foil hats on. Before we go further, this is not a guide on how to protect yourself against government surveillance ( although it helps ). This is more of a guide on how to protect yourself against corporate surveillance.
It’s pretty long so let’s get started…
1. Lock your iOS device with a custom alphanumeric code.
It’s a good idea to start with the entry point of your iOS device. Setting a passcode it’s the first thing you should do when getting a new iOS device. Apple even allows you to do this during the initial setup of the device.
You have three options for a passcode: 4-digit numeric code, custom numeric code ( 6 digits ) and custom alphanumeric code.
You should always choose the custom alphanumeric code and make your password as long and as complex as you can handle. A good, complex alphanumeric code also helps with the encryption of your iOS device.
TIP 1: make sure you remember your passcode
TIP 2: for even greater security, disable Touch ID, but that will inconvenience you. Not 100% necessary.
TIP 3: Set “Require Passcode” to “Immediately”
To change your passcode go to Settings > Touch ID & Passcode > Change Passcode > Passcode Options


2. Enable “Erase Data”
Just in case your iPhone gets lost or stolen, you can reduce the risk of your data ending up in the wrong hands by setting your device to delete everything after 10 failed passcode attempts.
To enable this go to Settings > Touch ID & Passcode > Erase Data

3. Manage What Can Be Accessed From The Lockscreen
While we’re still in the Touch ID & Passcode section of the Settings app, review what can be accessed from the lockscreen ( while the phone is still locked ). Customize this to suit your needs.

4. Manage Notifications
Your phone doesn’t need to be stolen or lost in order for sensitive data to be accessed by other people. All it takes for somebody to access private info like messages, and emails is tap the home button and everything is available on the lockscreen.
Luckily there’s an easy fix.
First you might want to set your iPhone to only show notifications preview when unlocked. Go to Settings > Notifications > Show Previews.

Next thing you can do, is disable lockscreen notifications for apps like Messages. To do that go to Settings > Notifications > [app name] > and disable “Show on Lock Screen”

5. Manage Built-In iOS Trackers and Turn Off “Share My Location”
I already went over this in my post about how to maximize the iPhone’s battery life. Let’s do this again…
Go to Settings > Privacy> Location Services > . Scroll down on the page and turn off “Fitness Tracking” if you don’t use it.

Go to Settings > Privacy > Location Services > Analytics > and turn off “Share iPhone Analytics” and “Share iCloud Analytics”. Why would you want to share that?

Go to Settings > Privacy > Location Services > Advertising > and turn ON “Limit Ad Tracking”.

Go to Settings > Privacy > Location Services > Share My Location > and turn off “Share My Location”. Why would you willingly do that?

Go to Settings > Privacy > Location Services > and go through all of your apps to allow or deny location access.
You can choose between Never, While Using the App or Always. “Always” is never a good idea. So it’s between “Never” and “While Using the App”. Personally, I have most of them set to “Never” and apps like Maps and Weather set to “While Using the App”.

When you’re done with granting or denying apps to locate you, go to System Services and turn off basically everything. You might not want to turn off “Find my iPhone”. That one is up to you. You can also turn off “Compass Calibration” and “Setting Time Zone”. Find an explanation of what these services do below…

Compass calibration: it’s used by apps where constant access to a refreshed compass reading is required. If you use any kind of Mapping apps, you might not want to turn this off.
Emergency SOS: When enabled, you can call emergency services without unlocking your iPhone by quickly pressing the Sleep/Wake button five times.
Find my iPhone: Allows you to track your iPhone on a map that you can access from your iCloud.com page. Even if it will come handy if you loose your device or it gets stolen, it can also be a privacy/security risk. Turning it off is your choice.
HomeKit: control supported third-party smart devices and accessories. Example: automatically turn smart lights on or off when you arrive or leave home. If you don’t use such devices and/or accessories, turn it off.
Location-based alerts: Receive locations based on your location. Example: reminder to call someone when you arrive at a specific location. Privacy/Security risk. Turn it off.
Location-based Apple ads: Allows Apple to track your location in order to deliver ads relevant to you. I mean if “track your location” and “deliver ads” doesn’t make you turn this feature off immediately, you should really stop reading this article.
Location-based suggestions: When you use Spotlight suggestions or Safari suggestions, the location of your iPhone at the time you open Spotlight, use Look Up, or submit a search query to Spotlight or Safari will be sent to Apple to make location-based suggestions more relevant and to improve other Apple products and services. Turn it off!
Mobile network search: Allows Apple to record and keep a database of cell towers in your area and monitor reception. Turn it off!
Motion calibration & distance: allows iPhones and Apple watches to keep track of how much you’re moving. I would turn it off and find other ways to keep track of my activity. But it’s up to you. If not used, you can turn it off.
Setting time zone: self-explanatory. If you travel to different time zone often, your iPhone will automatically set the correct time zone as soon as you’re connected to the internet. I would turn this off ( even if it’s on in the screenshot above ) but it’s up to you.
Share my location: allows you to share your current location with friends and family via the Messages app and Find My Friends app. Privacy/Security risk, might want to turn it off.
Wi-Fi Networking: Just like “Mobile network search”, this feature allows Apple to collect information about nearby Wi-Fi networks. Turn it off!
Significant locations: this is just creepy, and a privacy/security risk. Turn it off. You can find an explanation of what it does in the settings.
iPhone analytics: sends analytics, diagnostic, and usage information to Apple. Turn it off!
Popular near me: sends Apple info based on what apps you use in a specific location so they can offer “better apps and services” in that area. Yeah, just turn it off!
Routing & Traffic: This allows Apple to monitor you in real time so they can improve its Maps. Just turn it off!
6. Turn Off App’s Access To Sensitive Data
The fact is that iOS does an amazing job sandboxing apps. Apps can’t communicate between them unless you specifically grant access.
For example, when you install Instagram ( I’ll get back to this one later ) it will ask you to access the photo library, camera and microphone. If you don’t allow these permissions the app is pretty much useless ( unless you’re just there for browsing ).
But if you install a, let’s say, flashlight app ( who does that anymore? easy, it’s just an example ) and it asks you for permission to access your contacts, photo library, or calendar you should not only not allow those permissions but delete the app immediately.
BTW: Instagram wants to access your contacts. Why in the world would I allow a Facebook-owned app to access my contacts?
TIP 1: You might want to disable microphone access to Instagram. Record your videos through the stock camera app and then upload them as stories or to your feed. There’s absolutely no reason Instagram should be allowed access to your iPhone’s microphone. Unless you go live. You can grant mic access while “live” and disable when you’re done.
To check which apps can access your contacts, microphone, photos, calendars reminders etc go to Settings > Privacy > Contacts etc and review the apps that can access your data.
NOTE: go through each of those menus ( contacts, calendar, reminders, photos etc ) and review which apps requested access, and disable where not needed.
TIP 2: you might want to delete and look for an alternative if an app requested access to your data in 2 or more fields, without any real use for its functionality.

7. App Detox
To reduce your exposure to privacy leaks, take a few moments and review all the apps you have installed. Delete all unnecessary apps. Chances are you have a lot of apps that you either never use or don’t really need. This includes games and those 30 photo editing apps you have.
You want to edit your photos? You can go in great detail editing them in the stock photos app. Or transfer them to your computer and use Lightroom and Photoshop.
8. Reset Your Advertising Identifier
Apple asks developers to select how their app uses IDFAs from among the following applications:
– Serve advertisements within the app
– Attribute this app installation to a previously served advertisement
– Attribute an action taken within an app to a previously served advertisement
If a developer has another acceptable use for the Advertising Identifier, it asks them to contact Apple.
When you enable “Limit Ad Tracking” ( discussed above ) iOS makes sure that an app doesn’t use the IDFA in any other way than for “Limited Advertising Purposes”.
However, you can add an extra layer of privacy protection by resetting your device’s ad identifier once in a while.
To do so, go to Settings > Privacy > Advertising > Reset Advertising Identifier

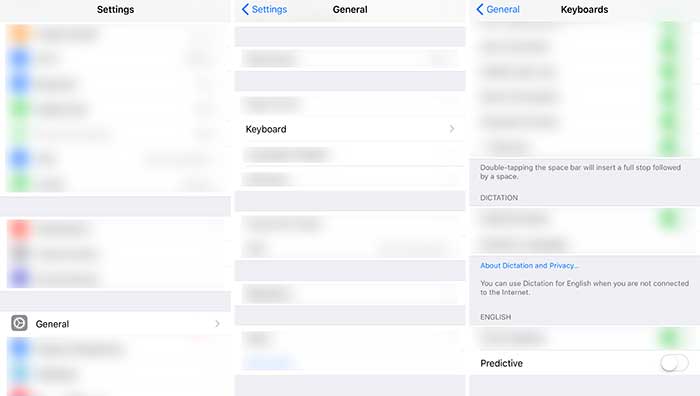
9. Turn Off QuickType
QuickType is Apple’s predictive text feature that was introduced back in iOS 8. It learns from what you type and offers suggestions to finish off your words or sentences. It might be convenient for some ( I personally don’t like it ) but you might consider not allowing a keyboard to learn how you type. And while QuickType can’t access usernames and passwords if you send such info via email or messages ( NEVER a good idea ), you might be surprise to find out one of your passwords shows up in suggestions.
To turn off QuickType go to Settings > General > Keyboard > Predictive
10. Enable 2FA on your Apple Account
Maybe this should’ve been #2 on the list, but I got carried away. Anyway…
I can copy-paste what is two-factor authentication and how to use it on you Apple devices. But you can read all about it on Apple’s page.
To enable 2FA go to Settings > [your name] > Password & Security > Turn On Two-Factor Authentication.

11. Manage Siri and Dictation
Here’s a quote from Apple’s iOS software license agreement.
By using Siri or Dictation, you agree and consent to Apple’s and its subsidiaries’ and agents’ transmission, collection, maintenance, processing, and use of this information, including your voice input and User Data, to provide and improve Siri, Dictation, and dictation functionality in other Apple products and services.Turn off Dictation: Settings > General > Keyboard > Toggle off “Enable Dictation”
If you don’t want to turn off Siri for good, at least turn off “Listen for Hey Siri”, “Allow Siri When Locked” , “Suggestions in Search” and “Suggestions in Look Up”.
You can do this by going to Settings > Siri & Search.
12. Manage Auto Lock
You’ve set a strong, complex custom alphanumeric passcode and managed your notifications. Now let’s minimize the window of time when someone can get into your iPhone.
Set the auto-lock to 30 seconds ( or the bare minimum that you find tolerable. ). To do this, go to Settings> Display & Brightness.
13. Browsing
Might be a good idea to stop using Safari for your web browsing. Obviously DO NOT use Chrome either. I would recommend Brave. But feel free to do your own research.
Unfortunately Apple won’t allow us to set a 3rd party browser as default on iOS. So if you must use Safari, let’s take care of some settings first.
Go to Settings > Safari > and…
- Search Engine > DuckDuckGo
- Search Engine Suggestions > OFF
- Safari Suggestions > OFF
- Preload Top Hit > OFF
- Frequently Visited Sites > OFF
- Block Cookies > Allow from Current Website Only
- Fraudulent Website Warning > OFF
- Camera & Microphone Access > OFF
- Check for Apple Pay > OFF
NOTE: WAIT!!!! Why would I turn off “Fraudulent Website Warning”? While turning this feature off might be a small security risk, it also relies on a constantly-updated database of URLs that lead to malware. Google’s Safe Browsing service is the most widely used database.
13.1 Browser Fingerprinting
You might use an AdBlocker and VPN ( discussed below ) to hide your IP, geolocation and block malicious ads, but you can still be identified and tracked online through more sophisticated methods. Like browser fingerprinting.
Browser fingerprinting can accurately determine how unique your browser and OS is using your screen resolution, language, time zone, fonts, cookies, platform, plugins and add-ons, WebGL, etc.
Nah bro I’m good… I use Firefox and I changed the right settings, and I use uMatrix, NoScript, uBlock origin, privacy badger, cookies auto delete, HTTPS everywhere and Decentraleyes and…. a few other top secret privacy add-ons.
Here’s the thing, the more browser add-ons and extensions you use, the more your stand out from the crowd and you’re easier to be identified and tracked. You’d probably be better using Tor browser + VPN ( discussed below ).
14. Use an AdBlocker
If you decide to use Brave as your browser on iOS, you’re pretty much set. The browser comes with a built-in AdBlocker, blocks pop-ups, enables HTTPS everywhere, blocks scripts, 3rd party cookies and fingerprinting.
If you choose to use Safari, get an AdBlocker. Which one? I don’t know. Most of them are not free ( don’t get a free one ) so do your research.
Why you need an AdBlocker? Because ads are not only used to advertise you products and services, but also to track your activity and behavior on the internet, steal your data, infect you with malware.
In 2016 Google took down 1.7 BILLION ads. 900,000 of those containing malware, 80 million fraudulent ads that that “deceived, misled, or shocked” users and 112 million “trick to click” ads that install dangerous software/viruses onto devices.
The worst part? You don’t even have to click on those ads to be affected by malware, tracking and ransomeware.
Feeling ambitious? You can try Pi-hole ( more on that later )
15. Get a VPN
Your ISP/carrier, websites you visit, apps that require internet access, or anyone connected to your network can see your browsing activity through your device’s unique ID.
But wait, I can go “incognito”. Yeah, incognito, on any browser, does not keep you safe from 3rd party snooping around. In fact it doesn’t keep anything private outside of your physical device.
A Virtual Private Network (VPN) can offer you a degree of anonymity, by masking your device’s IP address from everyone but the VPN provider.
And because it’s still technically possible, in many cases, for your VPN provider to snoop around it’s essential to do your research and use a good VPN provider.
Here’s some tips on how to choose your VPN provider:
- NEVER EVER use a free VPN provider. They sell your data. NOTHING is free
- Check provider’s Privacy Policy. The first thing you need to check is what happens to your personal information once you sign up with them. Look for providers that don’t collect or share your personal info. Providers that request as little personal info as possible from you to sign up with them and maybe even allow you to pay anonymously through Bitcoin.
- Once you did your research and ended up with 2 or 3 providers, do a research on their VPN speed. However, you still need to test the VPN yourself as you might have different results. Most providers have a 30-day money back policy anyway.
- Location is important when choosing a VPN provider. You might want to look for providers that are based outside of the Five Eyes, Nine Eyes and Fourteen Eyes. Eyes? WHAT? Yeah, it’s a global mass surveillance program.

I would recommend taking a look at ProtonVPN and Mullvad. But this doesn’t mean that you shouldn’t do your own research.
NOTE: ProtonVPN has a free option, based in Switzerland ( outside the five, nine or fourteen eyes ), developed by CERN scientists. Mullvad offers a 3-hour free trial, based in Sweden ( inside the fourteen eyes ).
Some people will also recommend using Tor, but besides the fact that it’s like going back to dial-up days when using Tor I don’t think that most of us actually need to use it.
Just get familiarized with everything in this post, start from here and dig deeper, understand why you need to do this, and you’ll get to Tor.
Ok here’s some info to get you started ( not for iOS )
If you want to use Tor however, use the Tor browser + a good VPN, instead of the Tor network. As you might know, Tor ( aka The Onion Router ) is a free piece of software and open network that was released back in 2002 and it is primarily funded by the US government.
The Tor network has been compromised and it’s way to slow for everyday use. The Tor Browser on the other hand is simply put a hardened and protected version of Firefox.
If you want to use the Tor Browser – Tor Network + VPN do this:
1. Download Tor browser
2. Go to Options ( three lines in the top right corner ) > Preferences
3. Select Advanced > Network > Settings
4. No Proxy > OK
5. In the URL bar type about:config and hit enter
6. In the search box type network.proxy.socks_remote_dns and double click to disable ( set value to False )
7. In the URL bar type extensions.torlauncher.start_tor and then double click to disable ( set value to False )
Now you can use the Tor Browser to protect yourself against browser fingerprinting and when used in combination with a VPN, you’ll also hide your IP and geolocation.
16. Encrypt
Your iOS device is already encrypted. Set a strong custom alphanumeric passcode. But what about your iCloud Drive or Dropbox or Google Drive or OneDrive or whatever you might be using?
You should never upload sensitive data to the cloud without encrypting it first. Or use a cloud service that offers end-to-end encryption like SpiderOak. Or set up your own cloud with Nextcloud.
But, for the sake of this article, let’s just pretend you’re using Dropbox ( which you probably are anyway ). Before syncing any personal files with Dropbox, consider encrypting the damn things first. Locally. Before they even fly away to the cloud.
- HOW TO: Easily Encrypt/Decrypt Folders on a Mac
- HOW TO: Easily Encrypt/Decrypt Files on a Mac
- A Quick Look At VeraCrypt Encryption Tool
17. Stop Using Google as Much as Possible
Google owns you! Period. All they do is deliver corporate surveillance into convenient, useful, free apps that is capturing all your private data – data used by google to dominate the online advertising industry.
Just stop giving them all your info on a silver plate. It’s not easy, but if you try, you’ll see it’s not that difficult either.
First step is to remove Chrome from ALL your devices. If you use Gmail, look for other email providers. Like ProtonMail ( same CERN guys ), FastMail, OpenMailbox, Mailfence, Mailbox.org. Do your research.
Google Drive? Use anything else. And encrypt.
Google Hangouts? You can use appear.in or Zoom.
Google Allo? Use Signal
Google Search? Use DuckDuckGo, Startpage, Searx.
Don’t be afraid. 99.9% of the time there’s a better alternative. All you have to do is ask yourself. Who owns this app/service? Is it Google, Facebook, Microsoft, even Apple ( they aren’t saints )? Ok, let’s see if I can find any alternatives.
18. Stop Using Facebook as Much as Possible.
You should remove everything owned by Facebook from your device. Facebook, Messenger and WhatsApp, Instagram.
First of all you’ll increase your battery life. Second of all if you want to use Facebook consider using it only when you actually need it and in a browser.
TIP: request desktop site and you can use Messenger in a browser too. If you do this, logout when you’re done and clear cookies and browser data.
Same goes with Instagram.
Instead of using WhatsApp, use Signal ( also discussed above ). Ok, WhatsApp uses Signal’s encryption protocol. But the app is owned by Facebook. Great argument huh? It is when you take in consideration all the things Facebook collects about you.
Since we’re talking about Facebook, stop posting every single detail of your life in words and pictures, stop tagging everybody all the time and please stop checking-in everywhere.
19. Use a Password Manager
We all have dozens of online accounts. All of them require a password. Complex and unique. Password re-use is a huge problem with large data breaches becoming more and more common these days, with billions of data records lost or stolen since 2013. So we kind of need a password manager.
But Safari has a built-in password manager, why can’t I use that? Because browser password managers suck…
Just get a password manager. There’s tons of them. You can pay for them or use a free, open-source, end-to-end encrypted manager like Bitwarden.
Do your research.
20. Log out!
The easiest way for a company to track you online is when you stay logged into various accounts. Be it Facebook, Youtube or your email. Use the apps/services and when you’re done, log out!
Also be sure to clear your browser history after each session. History can easily be tracked when you’re back online.
Ok this one might be easy to do for most apps and/or services. But I need my email. Well, if you use your email in a browser, logout when you’re done. Or get a mail client on your computer like Thunderbird or PostBox.
You’d be surprised how many company logos and mail signatures come with embedded tracking.
If you’re on a Mac and use the default Mail client go to Preferences > Viewing > and uncheck “Load remote content in messages”

You can do the same on an iOS device. Go to Settings > Mail > Disable “Load Remote Images”

21. Home Assistants
How convenient is to say “Alexa turn on lights in the living room” or “OK Google play [song_name]”? Guess what? Your super convenient “personal assistant” now knows that ur home at 8:30 PM, in your living room and you want to listen to a specific artist.
Next thing you know, you get an email from Amazon “hey, we thought you might like these CDs and vinyl records that other people are buying”.
Siri is no different, see #11.
Vizio was busted for using 11 million televisions to spy on its customers.
So what comes in a pretty package, disguised as convenience is actually corporate surveillance. Might be a good idea to avoid “smart home” devices. Don’t worry, you’re not alone.
You might think this is a joke. But these kind of things happen whether you like it or not. And it’s getting worse.

22. Pi-hole
I can’t even start to explain in just a few words what Pi-hole is. Others might be able to do it. I can’t. Or I don’t want to? Does it matter? No, because there’s a video on YouTube ( wink, wink ) that briefly describes what Pi-hole is. Start here and dig deeper if interested.
23. Update!
Always a good idea to update to the latest iOS and macOS. You might want to wait a couple of days to see what other people are saying ( bugs and battery life-related ). But definitely update.
The same thing can’t be said about Windows. Windows 10 is a total privacy disaster .
If you’re on Android, I’d suggest you stop commenting on every iPhone video on Youtube saying Android > iOS/iPhone or Samsung Galaxy S8 > iPhone 8 or Pixel 2 > iPhone X. Just for one second.
Let’s get a few things straight:
1. Android is not better than iOS by any means. Get over it. Android might suit your needs better than iOS. That’s a whole different story. Different products for different people. End of story. Same goes for iPhone users. Really now, what’s this battle you’re fighting? And who’s winning?
2. Android is owned by Google.
3. But Android is open source. Exactly why if it comes straight from Google it comes ready to track every single aspect of your life and if it comes from a 3rd party it comes full of bloatware ( + tracking ).
READ: Google collects Android users’ locations even when location services are disabled
What can you do? Flash your ROM and install something like CopperheadOS or LineageOS. Start researching and do it right.
If you’re running Linux… if you’re primary OS is linux, you probably know what you need to do.
Look, at the end of the day you can do whatever you want. But take an informed decision.
Read this post. Read 10,000 other posts on privacy and security. And then, if you still think this is all a hoax or conspiracy theory or whatever, you can go against everything thousands and thousands of people are warning you about and do whatever the f*ck you want. Just get all the facts first.
Want more? A WHOLE LOT MORE? Watch the video below. It’s 3 hours long but well worth the watch. Disclaimer: paranoia might take over if you watch it.